
Sam Banks, our Technical Digital Strategist at Fuelius, explains how you can easily export data such as contacts from within HubSpot!
Hub: Sales
Difficulty: Easy
Tier: Free/Starter+
Sometimes you need to know how to take your data like contacts out of your HubSpot portal, so follow this straightforward process to learn how!
If you're familiar with HubSpot, you'll know HubSpot is great for many different things. However, sometimes some efficiencies can be made in exporting your data into other systems.
You’ll be pleased to know that this is actually a fairly straightforward process. And in this example, we're going to be explaining how you can export contact data.
Step 1
First, head over to Contacts in HubSpot where you'll see your overall database or a limited view depending on your HubSpot permissions. It's important to note that in order to import or export data from within your HubSpot portal, you will need sufficient user permissions from your HubSpot portals admin.
Next, unless you're looking to export the entire contact database, condense the overall database view to the actual data you want to export using the filters near the top of the page.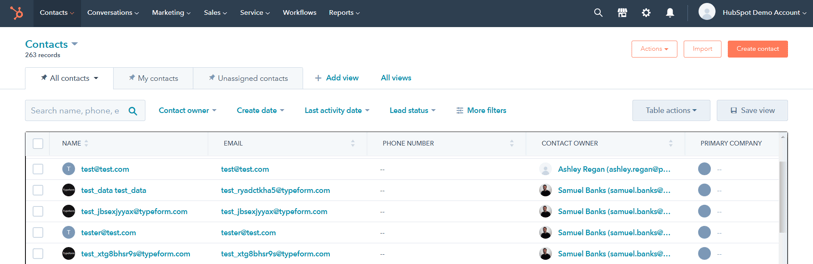
Step 2
You'll want to make sure that the data displayed for each individual contact is relevant. To do this, you'll want to edit the headings above the data, so first click the button on the right-hand side that says table actions and then select edit columns.
Here, you can now customise how much or how little of the data is shown, and therefore later exported, for those contacts. Make sure you're happy with all the data showing before exporting.

Step 3
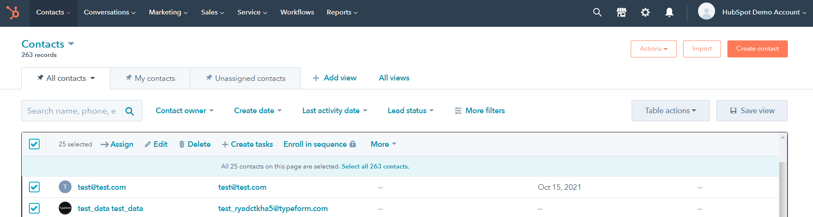
Before you're ready to export, you must select the contacts you wish to include. You can do this by ticking the individual boxes on the left-hand side of the relevant contacts, or tick the box at the very top to select all the contacts in your condensed view on that page.
If you have many contacts and they spread over multiple pages, select all on the first page, and you should see a blue notification from HubSpot pop up enabling you to select all contacts.
Step 4
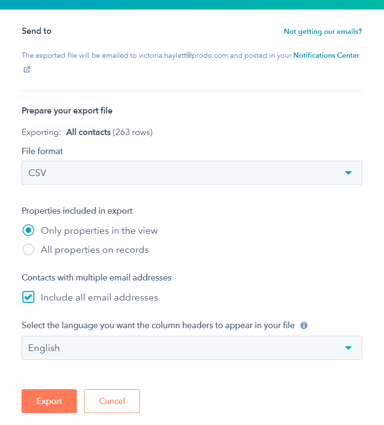
Once all the data you're looking to export has been selected, simply head over to table actions again, but this time click export view. Next, select the format type e.g. a CSV file, and then it will ask you what properties you want to include. We already did this earlier when we changed which headings you wanted to include, but in case you've changed your mind since then, you can select all properties on record.
Also, if one of your contacts has more than one email address attached to them, you can choose to include these by ticking the relevant box in this window. You can also change the language here should you wish.
Step 5
Feel free to double-check your work and the changes that you've made, and when you're ready, hit Export. You'll receive an email shortly after, as well as a pop-up within HubSpot when the file has been created. By clicking the pop-up link, the file will download onto your computer. If your data file is quite large, it may take a few minutes to process.
If you miss the pop-up, you should see it in your notifications by clicking the bell icon in the top right-hand corner.

And that's it. That's how to export your contact data from your HubSpot portal.
If you're looking for further HubSpot support from an Elite HubSpot Partner Agency who are in the top 1% of certified HubSpot agencies, our team would ❤️ to help you out! Book a call with us today.