
Find out how to create a form in the HubSpot CRM! Whether you're looking for something simple or more complex, we take you through a step-by-guide on how to build a form, the different types of forms you can have in HubSpot and how to use additional features like hidden and progressive form fields. Plus, how to report on your forms to keep track of how they're performing...
Hub: Marketing
Difficulty: Easy
Tier: Free/Starter+

Understanding HubSpot forms
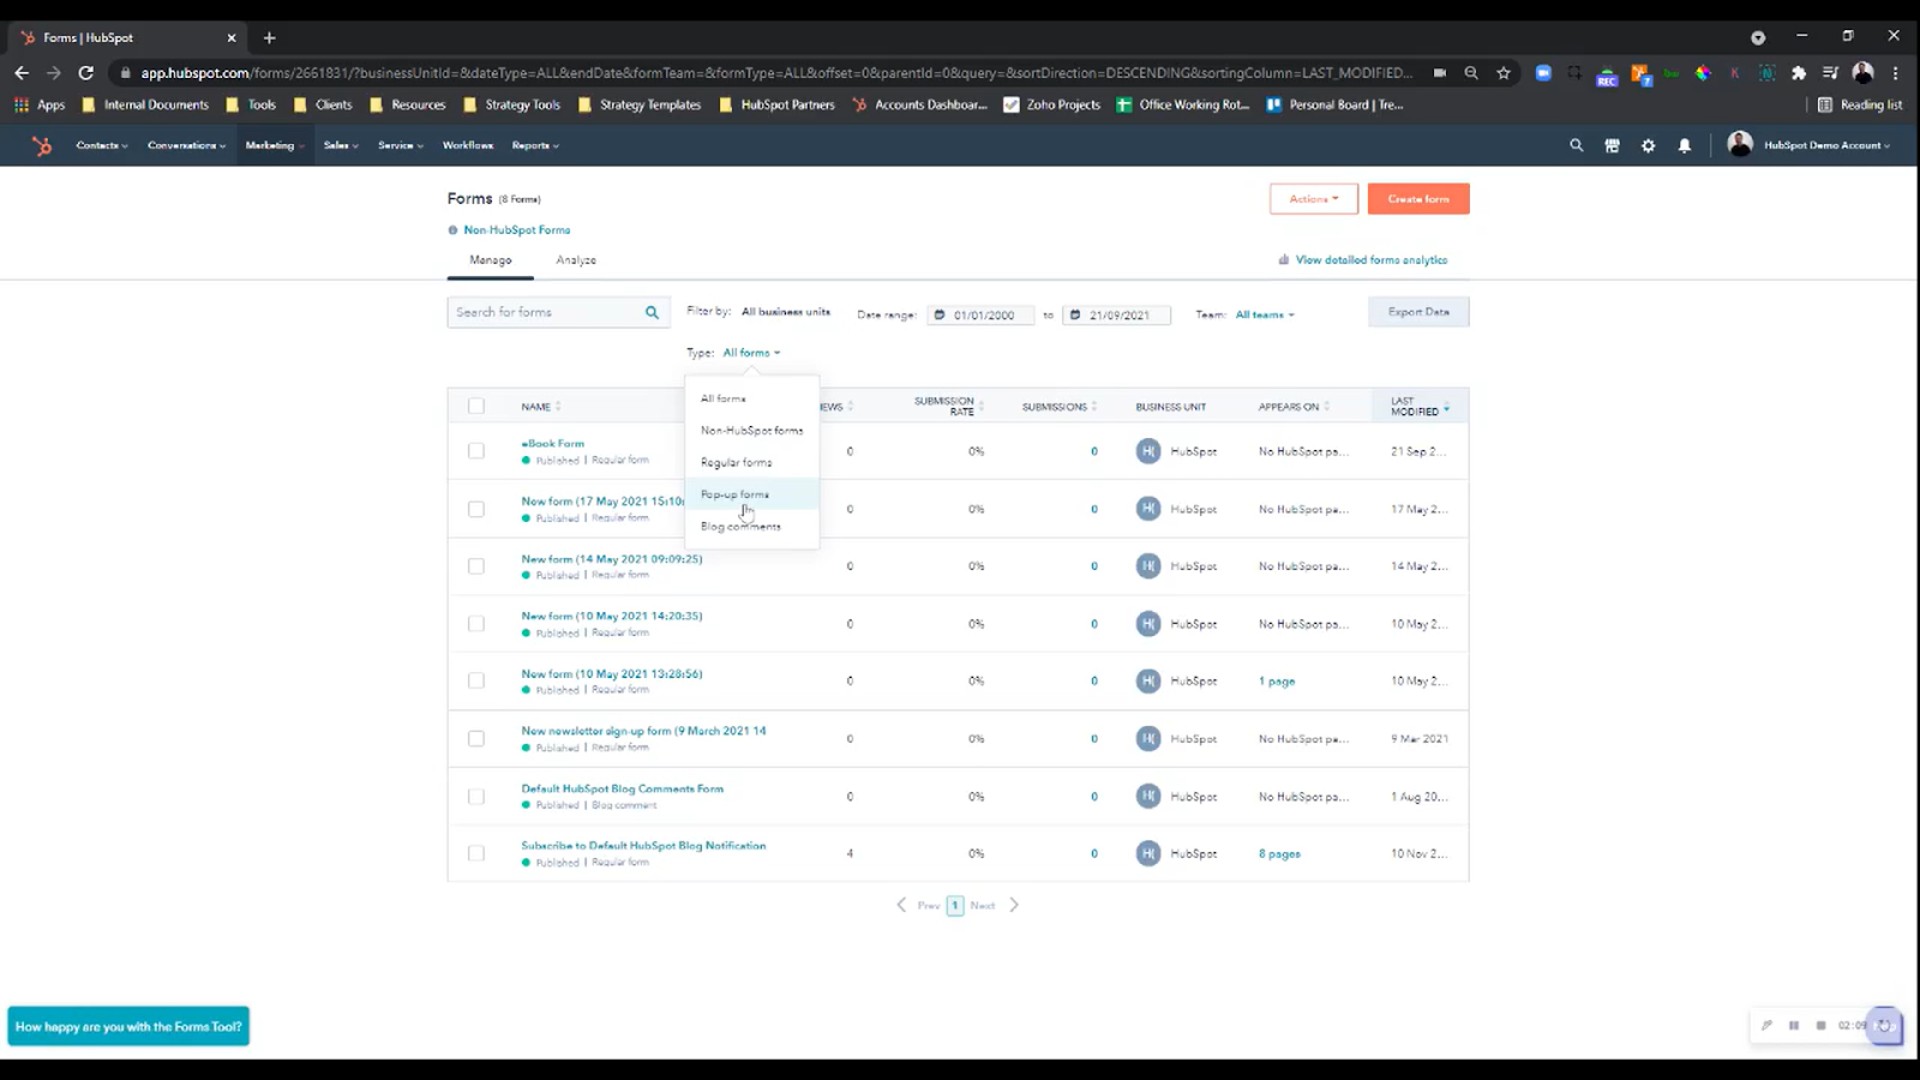
Like anything in HubSpot, you can create a form and make it as complex or as simple as you need it to be. To get started with the process, you're going to want to head over to Marketing, Lead Capture and then click on Forms which will bring you to the overall forms page and show you a library of forms that have been historically created in the account.

Here, we can see all of the forms listed in the account, arranged by views, submission rate, submissions, as well as what Business Unit it’s part of. HubSpot has recently launched Business Units which allows you to have multiple brands sit within the same HubSpot portal. This feature also allows you to create assets that may correspond to Brand A rather than Brand B, as Brand A may have its own bespoke branded templates.
What you can quickly understand from the forms library is where these forms are embedded, for example, from where it says ‘appears on’ you can click into the pages and it will list out the eight pages the form has been embedded on. This allows you to quickly understand how integral that form is to your overall digital presence.
You can also see when the form was last modified, as well as the ability to segment out by particular team forms, when using partitioning, for example, and the ability to export all the data to a CSV if you need to do any manual manipulation. You can change the date range to actually reflect what kind of information you want to gather, as well as segment further by the different kinds of forms you can have in your account.
By default, HubSpot forms can be split into four core categories - you can have Non-HotSpot Forms - this is a form that is used by a CMS and then integrated into HubSpot and this allows for data to flow into HubSpot, but are not easily accessible. This may be a WordPress Form - in this instance. Then there’s a Regular Form which is a HubSpot form that's been created by the form builder that you can then embed either on HubSpot pages or on CMS pages, which is the advised route.
The Pop-up Forms are next and these are forms that work in exactly the same way as a Regular Form, except for their nature of them - they are designed to pop up on a particular page, either the bottom left, bottom right, centre, or even as a dropdown. Finally, there’s a Blog Comments Form which is essentially where users would fill in comments and then post them onto the blog post itself for everybody to see.
In order to get started, you want to understand the library in terms of the different options available and the ability to go between the Manage tab as well as the Analyse tab. The Analyse tab allows you to quickly understand all about the Business Units, so if we use Enterprise, we can then change the date range and it will show us all of the aggregated form data from the entire HubSpot portal. This will enable you to quickly understand how many views all the forms have had, what the overall conversion rate is, as well as the submissions. This can then provide you with relevant information from questions such as, when did we gain more submissions? - Did we run a promo that coincided with a rise in form views versus submissions? Or, should we do a massive embed review in terms of where we place forms more strategically, and will this lead to a rise in submissions?
If you’ve seen our HubSpot Reporting video then you may be aware of Dashboards. This is where you can save your reports for ease of access for weekly or monthly reporting.
Lastly, you can rank your forms in terms of views, so you can quickly understand which ones are the high performers. It is also possible to sort them by submissions to understand which are the highest converting forms.
Creating a form
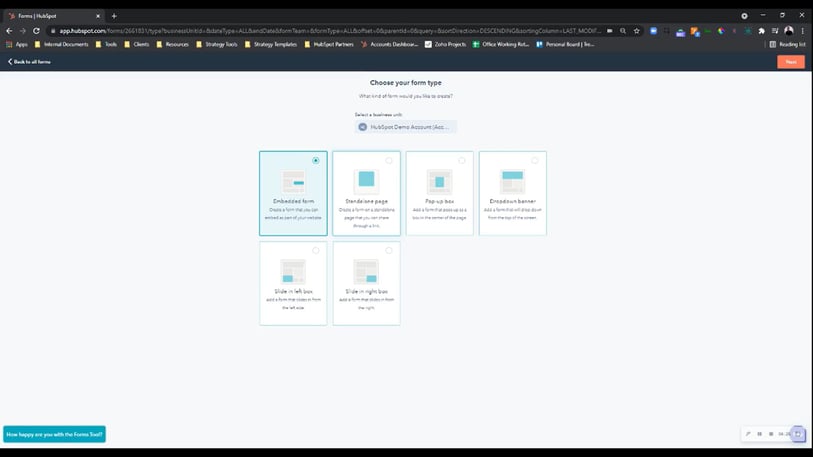
Now, going back to the library on the Manage tab, let's start creating a form. Here, you will be presented with a variety of options - in most cases, you'll be using an Embedded Form - this is a form you can create in HubSpot and then embed elsewhere, such as on WordPress, Umbraco or even HubSpot pages on CMS.
The other options you have available to you are having a pop-up box, a dropdown banner, a sliding left, or a sliding right and these four are all now considered Pop-up Forms after being rebranded. These forms will pop up after a particular amount of time, they take up less real estate and are less static in approach. Finally, you've got a standalone page - simply a form on a URL with no body copy or images. This is typically best used as part of roadshows or events where you can allow someone to quickly scan a QR code to gain access to the form where they can fill out their details for easy data capture.
Step-by-step guide
Step 1
For the purposes of this guide, we’ll use the embedded route, but the overall premise and the framework are exactly the same for any type you choose. If you're on Enterprise and using Business Units, you can then select what brand they coincide with for further partitioning within your account. Once you select that, press next and you can even have a template based on registrations, contact us, sign up or you can create it from scratch. If you're looking for truly bespoke user cases.
Step 2
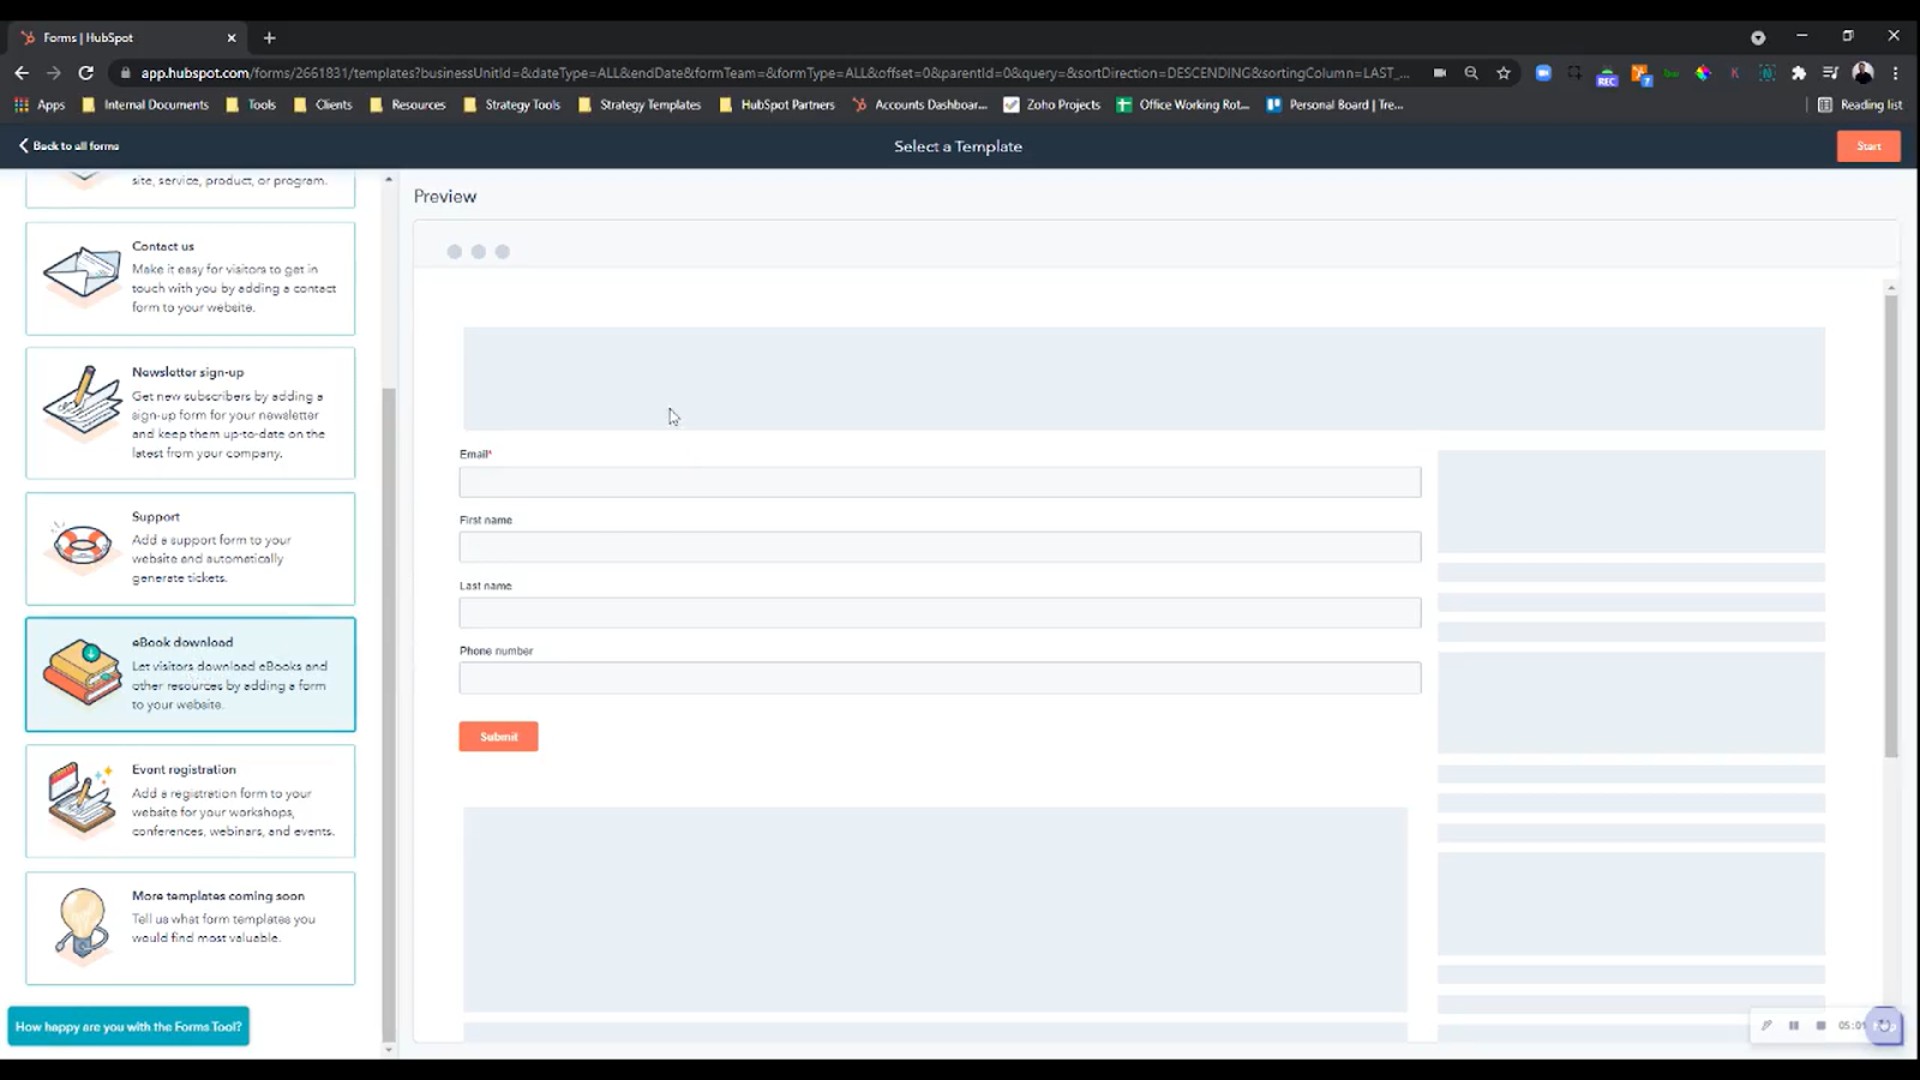
Typically, most people tend to use eBook downloads, so we can select a template there and preview it. If you're happy with the fields you're asking for, then you can press ‘Start’.
Step 3
You're not limited in terms of what fields you want to collect, so you can start with a template and then further customise it, so we may want to set up a new eBook form, but this time we want to capture MQLs. In this instance, we may ask for more information than we would on a lead form, as the people filling the form out are warmer and more familiar with the brand, therefore we can get away with asking for more.
Step 4
Down the left of the page, you’ll see all the properties that coincide with the account. You also have the ability to create new properties from within the form builder, rather than going into the settings or the back end to do so.
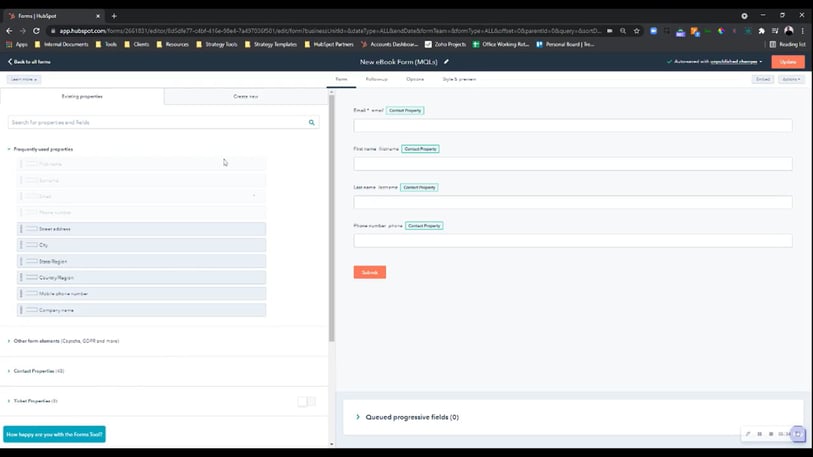
For this guide, we're going to stick to the ready-made ones so we can reorder fields and drag the first name so that it appears first, for example, then drag the last name field next and reorder them like this as we go. HubSpot also allows you, from a CRO perspective, to condense your forms, allowing you to put them on the same line. This will mean that the forms look a lot smaller, as a form that contains form fields listed out in a linear style will look a lot bigger than a form that has been considerately laid out in a horizontal alignment.
What we could also do is choose to ask for a phone number, so their mobile phone number, or we may want their company name as well. This means we can slowly build out this form until we're happy with the different fields included. Another option you may want to consider is including recapture on the form as well, to stop any spam submissions.
Again, you can select any properties that coincide with the standard HubSpot objects or, if you view our Custom Objects video on our HubFuel series, you can also add in properties you've created as part of Custom Objects as well.
Step 5
Once you're happy with the form as it stands, you may want to standardise the way people input their details. To do this, you can select any field and you then have the option to make this required so that the person filling in the form has to provide a value before they can submit it.
The option is also available to select ‘help text’ for any of the form fields. This is a byline that sits underneath the box and says something like ‘please provide a name you wish to be referenced by’. We can then populate the box as well to really simplify the data entry process and include a greyed-out ‘Fred’, for example.
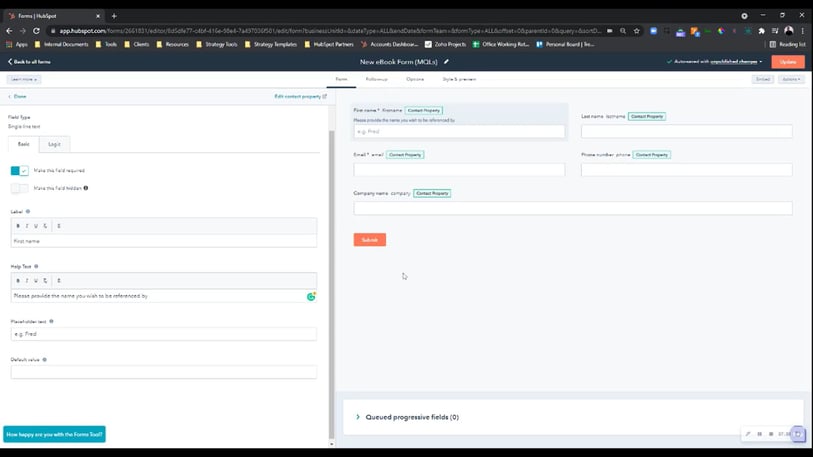
If you want a value for a field that hasn’t been filled in, you can add a default value. This value will typically take the place of the actual field, so if someone wasn’t to provide a first name, for example, it will fall back on this value. This is advised for any kind of field where you may ask for a particular product type that they may not be interested in or are not sure about.
Step 6
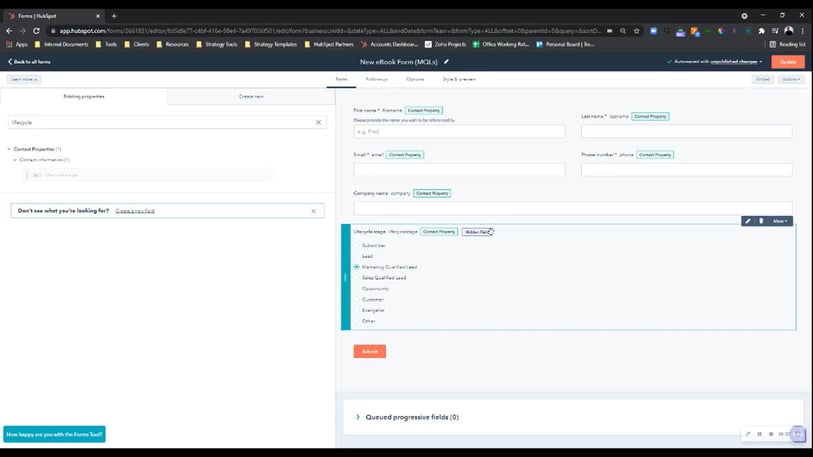
Following this, we just have to go through and select the ones we want to make required. We can choose to make the phone number required but we may opt to leave the company name blank as a sole business owner may not have one.
At this stage, you may be wondering if they converted as a lead on an MQL form, then how is this any different? Well, this will allow you to track the lifecycle stage fields that exist within the portal.
It’s possible to use a mixture of fields and hidden fields that aren’t visible to the front-end user - only at the back end. The fallback value for this MQL form is set by making sure we pre-select ‘Marketing Qualified Lead’, meaning that when they submit the form, we can then set them as an MQL which allows for better email and communication and, ultimately, better reporting for the Marketing to Sales handoff. Any hidden fields that you've listed out will have a hidden field tag applied to it for ease of access and any pre-selected form value field values will also be visible.
Step 7
Once you’re happy with how the form is built, you also have the ability to use queued progressive fields. A progressive field allows you to profile this lead or prospect from any forms previously submitted to get more information. So, for example, if we know their first name, and last name, or if we know their phone number, it may be logical to then ask for the country that they reside in to enable us to get more into geographical segmentation. Likewise, at this point, you may want to ask about the company size if we now know their company name, for example. Just be aware that by having progressive fields in place, the form will be able to autofill answers already known from previous forms, so be mindful that the order of your questions matches up.
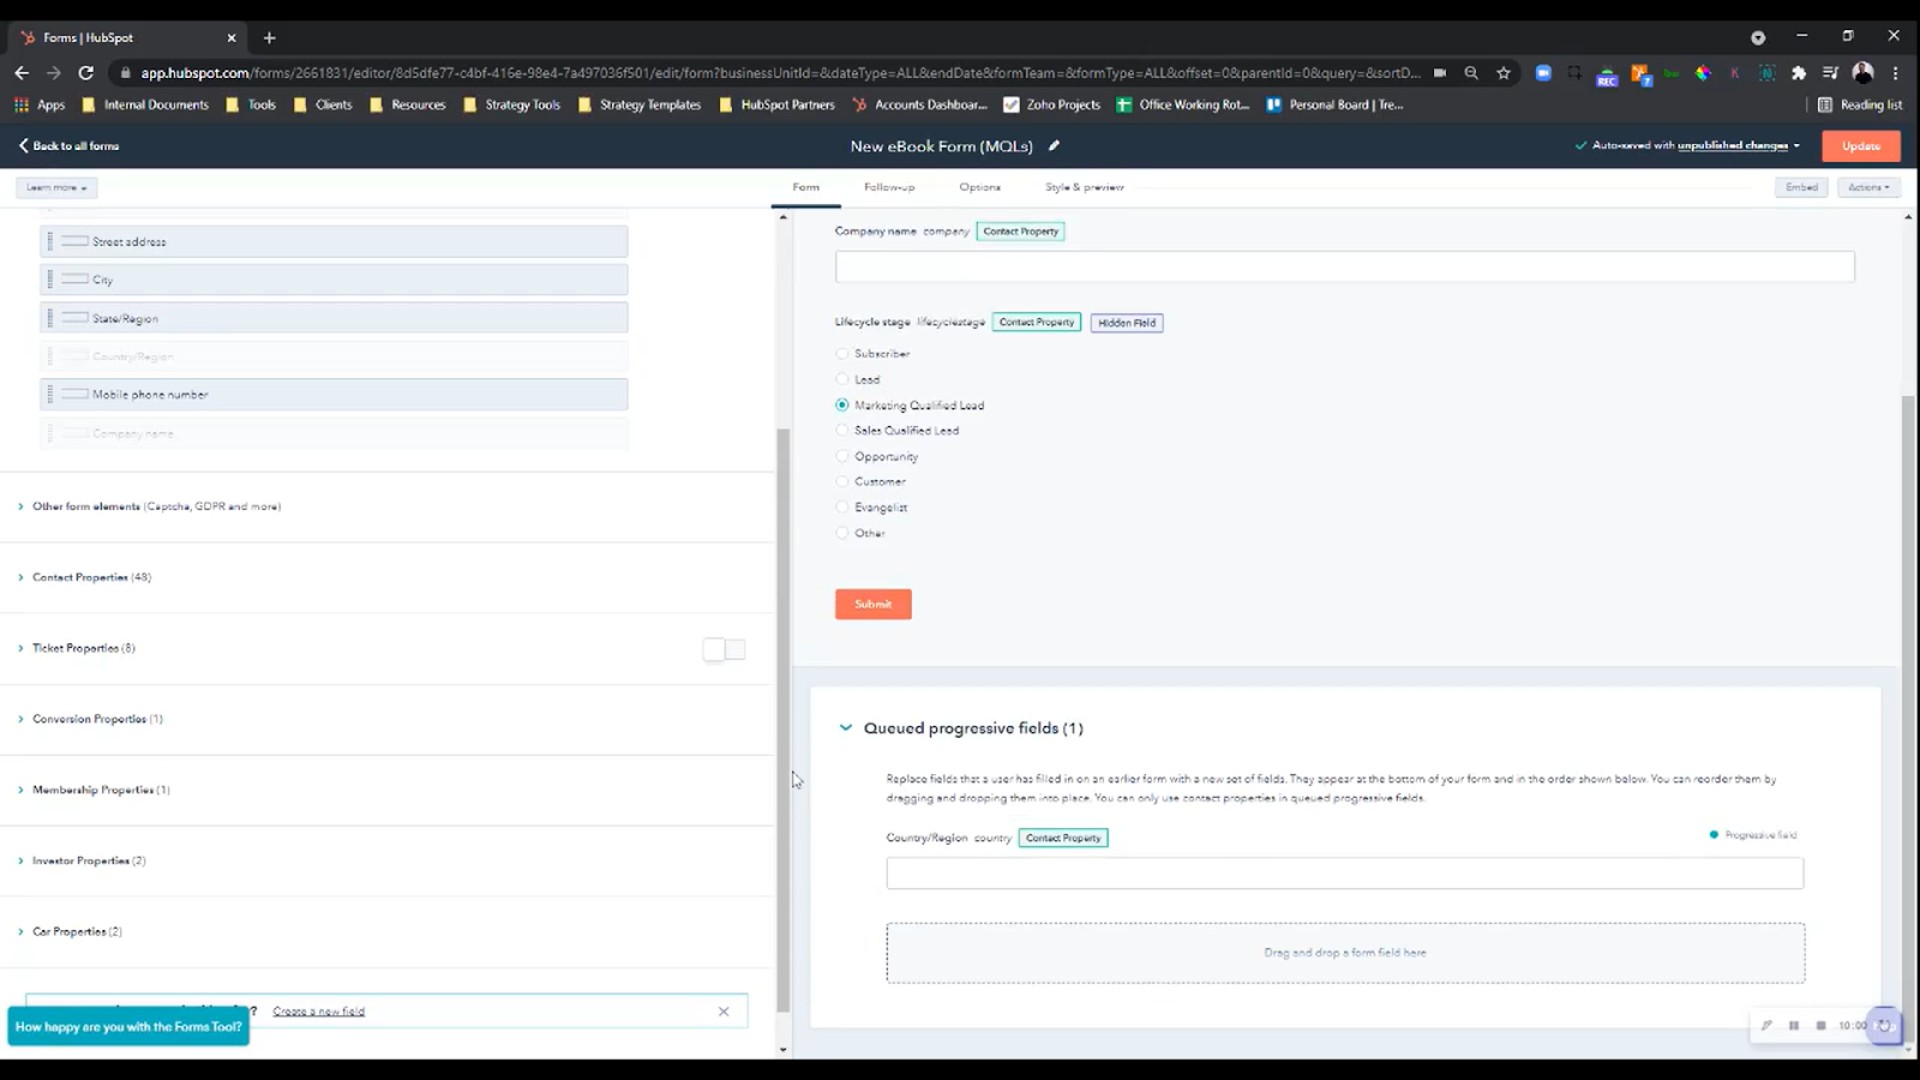
Once you start to list out your progressive fields, you can have more control, rather than just assigning a relevant field in a random order. What we can do is we can then say right, we now know the company name so we can replace it with the field, and then it will show the company size as well. You can select which fields you want to be progressive and which ones you don't.
Step 8
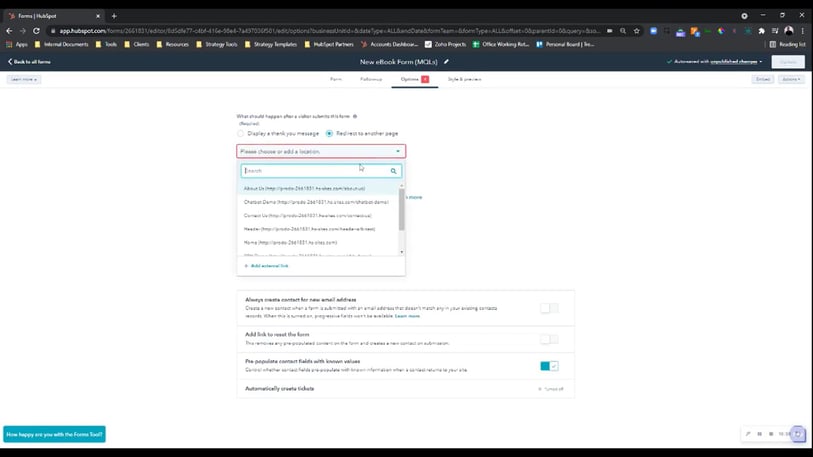
At this stage, we can head over to the tabs to set up a follow-up email based on when the lead submits it and then decide what the options are. For example, we may want to display a thank you message but what we can also do is redirect to a thank you page - so, if they submit our eBook form, we can then send them to the Chatbot demo page. From a CRO perspective, it's always important to use thank you pages to continue the journey to maximise cross-sells and upsells.
Step 9
At this point, we can send a follow-up to notify the contact owner of their actions. These notifications can also be sent to subsequent colleagues as well just in case they are on holiday or just for awareness. If you set up teams in your HubSpot account, you can also notify them at this point. If you do geographical or international marketing, you may choose to format the field and the error message to be in a different language.

By default, you will have selected to pre-populate contact fields with known values which means that if my name is Fred and I've submitted four forms before this one, it will already put Fred in the placeholder text because we know it from the CRM, so it’s advised that you leave this option on. However, you then have the ability to add a link to reset the form and this is advised for anyone who's running a webinar or an event form where people are going to continuously visit your booth, for example, to fill out this form. The last thing you want to do is constantly have to refresh the page, so a link will be much simpler. Once you're happy with the overall logic of the form and the progressive nature of it, you can then style it.
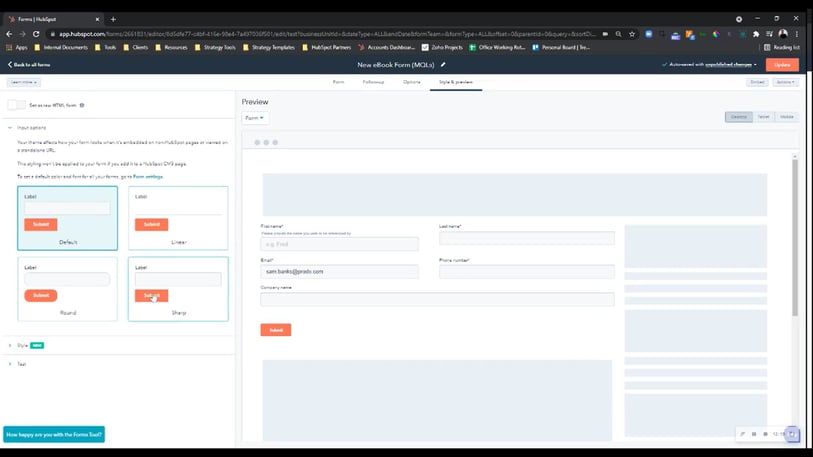
Step 10
There are many options to style the form, for example, you can select if you want it as raw HTML, you can style the button and you can then select your colour scheme and the overall font - perhaps you want the text to be Helvetica, you can choose this here and it will then carry across when you embed the form.
Step 11
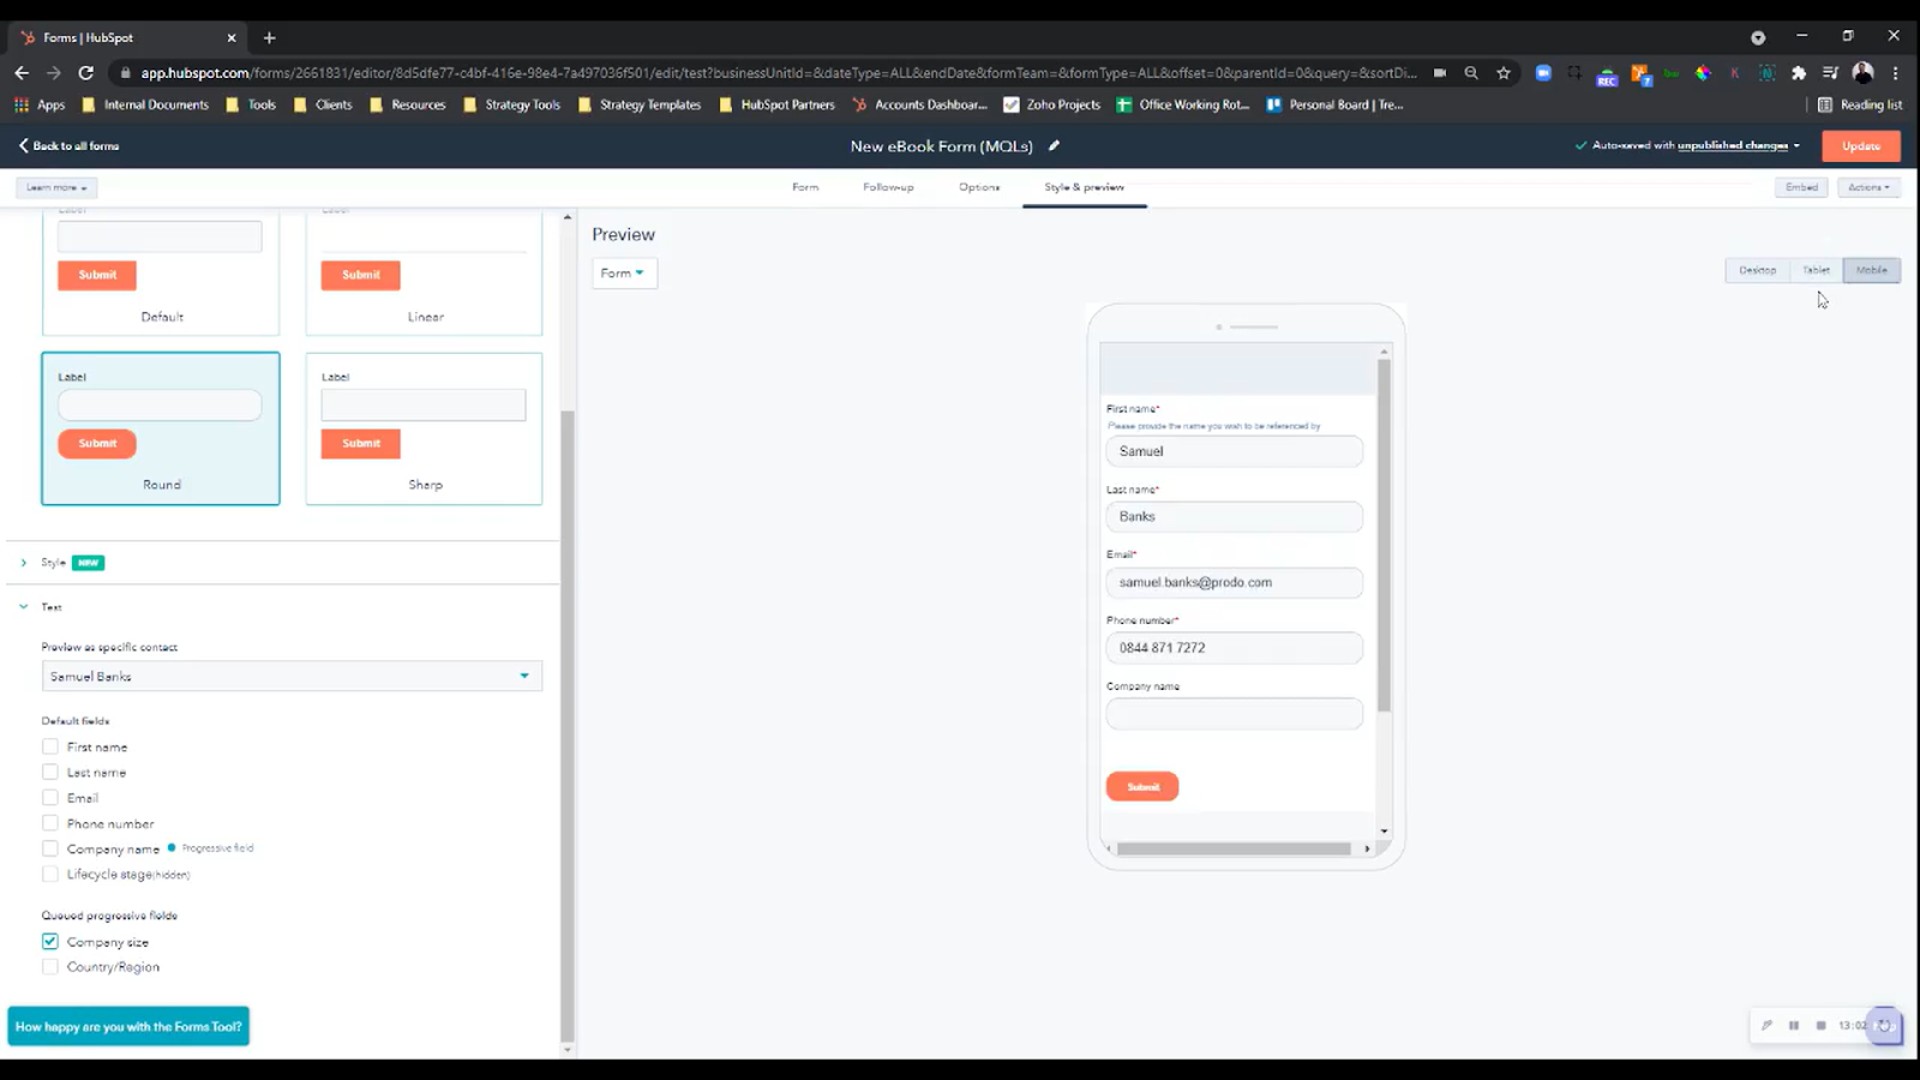
You can then test your form with a contact from within your CRM to see what the form would look like and how it would respond.
We can then also preview the thank you page just by pressing the drop-down, however, as there’s no thank you message with it being redirected, there'll be nothing to show. It’s at this stage that you can also preview by the device as well.
Remember that if you’re embedding the form elsewhere, you may need to apply CSS to ensure that the style correct - just as any system would ask you to do so.
Step 12
At this point, we can press update to publish our form and we’ll receive the embed code to use if we’re putting it on another CMS or, alternatively, to put it on a tool where we want to embed the form. This will make sure that our data, even if it's not on a HubSpot page, will still come into our CRM. Ultimately, you can then share a link to the form directly if you don't want to embed it anywhere.
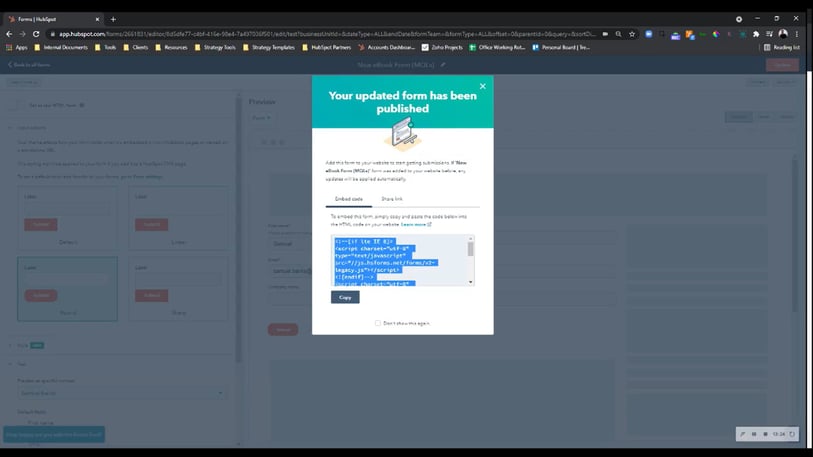
For any changes made, remember to press ‘update’ and ‘publish’ to keep your form up to date. The form will then be added to the overall library and we can start using this in landing pages, pop-up forms, workflows, in all of the different assets you can create in HubSpot, and we can now use this form as a central place to standardise our data entry.
Don't forget, you can always compare forms by selecting specific ones or pressing the new ‘compare forms’ feature and it will show you a preview of each form to allow you to easily split test, and analyse.
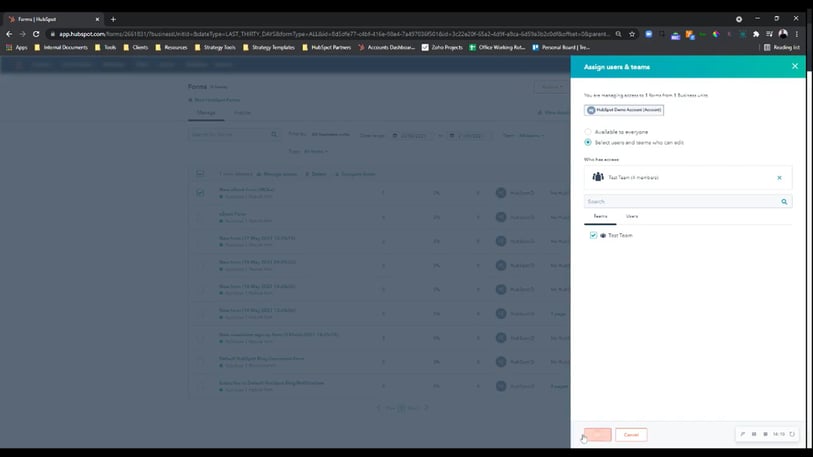
Lastly, if you're also on Enterprise, you can then manage the access and partition this by particular teams so that only specific teams can see certain forms, such as the Test Team in this instance.
So now you know all about creating a form, all the way from progressive to standard forms, as well as what you can do on the back of creating a form.
If you're looking for further HubSpot support, our team would ❤️ to help you out! Book a call with us today.